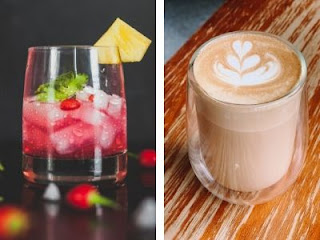
Beverage Photography - The Basics
FROM SUMPTUOUS Barista-style coffee and glass-chilled cocktails to high-speed splashes and the allure of mouth-watering 20-year-old Scotch on the rocks, the art of great beverage photography is an area of expertise all of its own. Very highly attention on detail for lighting, composition and technique make it just as much, if not more, of a creative discipline than photographing its dry counterpart. In fact, we could probably fill a book with all you need to know, so we’ll have to suffice with the basics.
As you’d expect, and as we’ve already mention, lighting is crucial when it comes to food and especially beverage photography. Backlighting, natural lighting, a multiple studio flash set-up, lighting to eliminate or at least minimise reflections in the glass is something helps create a smooth image that doesn’t distract from what you want to convey. Sometimes the reflections add to the appeal and atmosphere, but for those where it doesn’t, experiment with using black card to ‘flag’ light and control its fall-o and beam.
When picking colour and your lighting style, think about the emotional reaction you want the viewer to have and come up with a concept that complements the nature of the drink and the subject’s style. For example, a rustic setting with coffee beans and warm lighting is ideal for a steamy coffee portrait, while a water-beaded tumbler filled with cascading whisky should have its amber colour and warmth emphasised under smooth lighting. In food photography, propping, composition and styling are no less important, so you also need to think about garnishes: ice cubes, fruit slices, mint leaves and zest twists–you can leave the tacky little umbrellas in the drawer, unless you’re going for a ‘wish you were here’ approach. Also consider the translucency of the subject; for beer and milkshakes, won’t work as well backlit as a clear Martini or vodka due to their density. You can browse stock photography sites and at food and drink photographers’ work for inspirational ideas and different approaches, until you find your own style.
Experiment with different angles and vantage points when composing, though you’ll find the best shots are usually taken at a lower angle than most food photography. This is because drinks are served in vertical glasses, so it offers a more flattering and natural perspective. The same metering and technique principles apply to drinks as with food: use a wide aperture for a shallow depth-of-field, an incident light meter to take readings from each light to manage the exposure and keep it simple; pay attention to the quality of the light rather than composing an elaborate image, at least to begin with. Try first by shooting cranberry juice, martinis or wine as they look great with garnishes and are fairly easy to photograph. Also, try iced teas, mojitos and orange juice–use lemon twists and mint leaves to garnish, and spritz glasses for a more thirst-quenching appearance.
TROUBLE BEVERAGES
- ‘Moving’ drinks: The challenge of shooting beer, or any fizzy drink, is they’re ‘moving’ beverages; when you pour them you create a head of foam, which has to be captured for the best photographs. It can take many, many pours to produce the right look to give the image movement. You also need to spritz the glasses to make them look cold, which is best done using a water spray comprising 50% water and 50% glycerin – waxing glasses first also helps retain beads of water and single corn syrup droplets can be strategically placed using a wooden skewer for bigger droplets. Have four or five glasses prepared as backups.
- Coffee: When we see a shot of a steaming cup of co ffe, most remember the glorious smell and its comforting warmth. Getting that sense and desire across in an image, though, is not easy. Real coffee has an oily surface, which you don’t want to show. Use Kitchen Bouquet or Gravy Master– a browning agent that dyes water the colour of coffee. If you do use fresh coffee, you want the surface to comprise about 40% bubbles as that’s typical of a coffee pour. To make bubbles last longer, mix water and Kodak Photo-Flo developing solution, then spoon the bubbles from the solution on top of the coffee. You can use washing-up liquid, but this creates rainbows in the bubbles. Look into how to create artificial steam, too, as it’s more manageable than real steam and allows you to produce more images in a shorter space of time, with a much more controllable outcome
TIPS and TRICK of The PROS
- Use manual focus with LiveView to make sure your image is pin-sharp.
- Try placing white card behind a glass of beer to reflect light through the drink and bring out its golden amber colour. Try it with Scotch, colas and fruit juices, too.
- Have spare glasses to hand to use as stand-ins while composing and setting up.
- Buy a small bottle of glycerin froma pharmacy and mix it with water (50/50) in a spray bottle and use it to coat glasses in a fine mist to make drinks like iced tea, beer and mojitos look cold.
- Keep mint leaves, lemon zest and wedges close for garnishing. Berries work well, too, with some drinks, as well as wedges of honey melon, cantaloupe and coloured straws to dress up cocktails. Less is more: keep props and colours to a minimum.
- Chill your glasses and liquid until you’re ready for your final shot. Putting it all together with actual ice can produce a natural cold look. You have to work quickly, though, as it won’t look like that for long.
- Use long tweezers, skewers or chopsticks to move ice, garnishes and fruit wedges to avoid marking the glass. Cotton buds are useful for cleaning up stray droplets.
Credit : Joseph Gonzalez
Billy Kwok


Comments
Post a Comment